FALL SERIES : 5 DIY FALL ROOM DECOR PART 1 I NEON DOTS
Hey neonators, it's neon dots here, and today I am starting my first fall series post! I love fall because I get to upload so many different posts and I think that you are going to love the posts related to fall this year and just the fall series in general because I have some really fun things planed for you guys.
You guys know the drill, if you are new to my blog, welcome to the neonator family, I'm neon dots and if you like this post, make sure to follow me on all of my social media accounts, which will be linked at the end of this post so that you can find out when I upload. Let's get started!
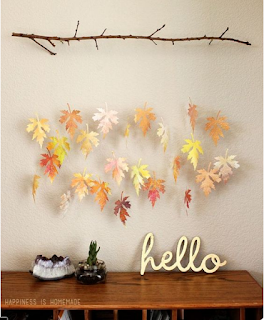
1) AUTUMN LEAVE HANGING DECOR

•Long branch
•String
•Glue gun
•Nails
•Hammer
•Fake autumn leaves
Glue your string to the branch being 1-2 inches apart, and glue some strings around halfway going downward on your string and you can hammer down some nails on your wall and place the branch on top.
2) FALL MASON JARS

•Matte paint
•Leaf stickers
•Pebbles
•Small candle
•Twine
•Paint brush
Place your sticker on top of your mason jar and paint around the sticker on the outside, and let that dry. Once it has, place your pebbles around 1/5 of the way in your mason jar and place the candle inside, and wrap twine around the top.
3) FALL WOODEN CHALKBOARD

•Round wooden piece
•Chalkboard paint
•Chalk
Paint your wooden piece with your chalkboard paint and let that dry. You can then write anything you want depending on the season or holiday, and I love this because you can use this decor piece all year round.
4) AUTUMN LEAF MASON JAR

•Mason jar
•Fake autumn leaves
•Twine
•Mod podge
•Sponge brush
Coat a thin layer of mod podge on your mason jar and put down your fake leaves and let it set (keep in mind, mod podge dries quite quickly so you want to work fast) and then put down another coat of mod podge on top of the leaves to secure it and let that dry, and then wrap some twine around the top.
5) PINE CONE JAR

•Big jar
•Small pine cones
•Thin fairy lights
I love this idea because it only takes a couple of seconds and it is so adorable. Fill up half of your jar with small pine cones (during the winter time you can coat the tips of the pine cones to look like fake snow) and jumble up the fairy lights and put that on top.
I really hope you guys enjoyed this post, and again, make sure to follow me on all of my social media accounts, which will be linked down below, and if you recreate any of these, make sure to use the #lookneondots on Instagram, or you can tag me, DM me, or send me a snap. Kisses to my neonators!
XOXO,
Neon Dots
Instagram: https://www.instagram.com/neondotsofficial/
Snapchat: neondots1
You guys know the drill, if you are new to my blog, welcome to the neonator family, I'm neon dots and if you like this post, make sure to follow me on all of my social media accounts, which will be linked at the end of this post so that you can find out when I upload. Let's get started!
1) AUTUMN LEAVE HANGING DECOR

•Long branch
•String
•Glue gun
•Nails
•Hammer
•Fake autumn leaves
Glue your string to the branch being 1-2 inches apart, and glue some strings around halfway going downward on your string and you can hammer down some nails on your wall and place the branch on top.
2) FALL MASON JARS

•Matte paint
•Leaf stickers
•Pebbles
•Small candle
•Twine
•Paint brush
Place your sticker on top of your mason jar and paint around the sticker on the outside, and let that dry. Once it has, place your pebbles around 1/5 of the way in your mason jar and place the candle inside, and wrap twine around the top.
3) FALL WOODEN CHALKBOARD

•Round wooden piece
•Chalkboard paint
•Chalk
Paint your wooden piece with your chalkboard paint and let that dry. You can then write anything you want depending on the season or holiday, and I love this because you can use this decor piece all year round.
4) AUTUMN LEAF MASON JAR

•Mason jar
•Fake autumn leaves
•Twine
•Mod podge
•Sponge brush
Coat a thin layer of mod podge on your mason jar and put down your fake leaves and let it set (keep in mind, mod podge dries quite quickly so you want to work fast) and then put down another coat of mod podge on top of the leaves to secure it and let that dry, and then wrap some twine around the top.
5) PINE CONE JAR

•Big jar
•Small pine cones
•Thin fairy lights
I love this idea because it only takes a couple of seconds and it is so adorable. Fill up half of your jar with small pine cones (during the winter time you can coat the tips of the pine cones to look like fake snow) and jumble up the fairy lights and put that on top.
I really hope you guys enjoyed this post, and again, make sure to follow me on all of my social media accounts, which will be linked down below, and if you recreate any of these, make sure to use the #lookneondots on Instagram, or you can tag me, DM me, or send me a snap. Kisses to my neonators!
XOXO,
Neon Dots
Instagram: https://www.instagram.com/neondotsofficial/
Snapchat: neondots1

Comments