LAST SUMMER POST OF 2016 : 10 DIY SUMMER ROOM DECOR I NEON DOTS
Hey neonators, it's neon dots here, and for my last post of the summer, I thought I would show you guys some summer room decor before you guys go back to school, if you still have time. I love DIY room decor posts, and I hope you guys do too.
If you are new to my blog, hi, I'm neon dots and welcome to the neonator family! If you like this post and want to find out when I post, make sure to follow me on all of my social media accounts ,which will be linked at the end of this post, and let's get started!
1) WHITE EYELASH POT

•Vase
•White paint
•Paint brushes
•Sharpie
•Mod Podge
Take your vase and paint it white, and let that dry. Then, draw on some lashes and a cute little smile with your black sharpie and coat that on mod podge.
2) FLORAL LETTER

•Letter shape
•Fake flours
•Glue gun
•Twine
Take your fake flowers and cut the stem off of it. Then, start gluing them onto your letter, and tkae some twine, and glue it to the back of your letter and hang it on your wall or door.
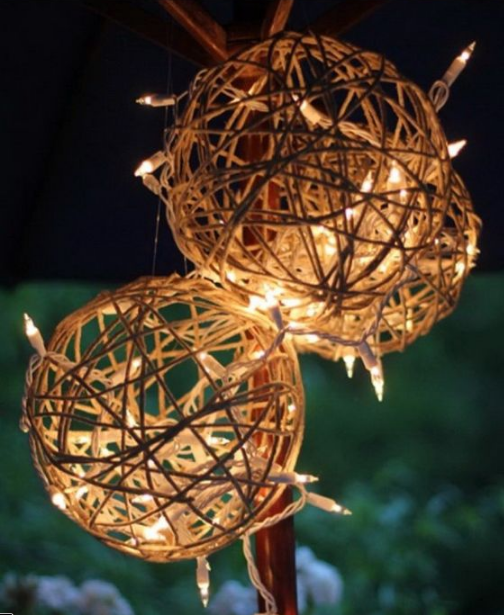
3) ROUND FAIRY LIGHTS

•Balloons
•Mod Podge
•Sponge brush
•Twine
•Fairy lights
Coat your balloon with mod podge after blowing up the balloon and pop the balloon. Then, let the ball dry and leave a large hole on the top. Take your fairy lights and put them in the hole.
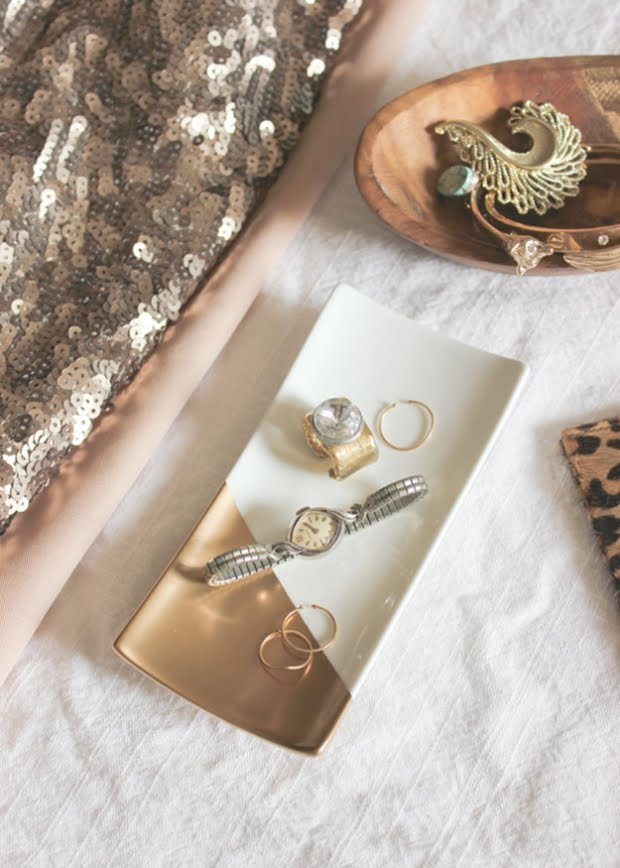
4) ACCESSORY TREY

•White rectangular trey
•Painters tape
•Grey paint
•Paint brush
•Mod podge
Make a rectangular angle on your trey using your painters tape, and on the bottom, paint on your gold paint and let that dry. Remove the tape and coat it with mod podge to seal everything in place.
5) DIY POLAROID HANGER

•Twig or stick
•Nails
•Hammer
•Twine
•Glue gun
•Scissors
•Printed paper
(I would use twigs and twine to give it a more homey feel)
Take your twig and hammer three nails on the twig with your hammer. Cut a long piece of string and hang up some twine on the top. Then, hang three long pieces of twine on the bottom and glue on three polaroids per twine, and cut three triangle pieces and glue them to the bottom.
6) MARBLE COASTERS

•Sculpey oven bake clay (various colors)
•X-acto knife
•Rolling pin or clear jar
•Large can, jar or stencil to trace
•gold liquid gilding
•Small paintbrush
•Mod podge
•Sponge brush
•Baking trey
•Parchment paper
1) Break off several pieces of color that you'd like to use for your coaster,
2) Roll them out with your hand on a clean even surface so they are even in length. It's okay if some are different thicknesses, that will give your end result a more interesting look.
3) Once they are all rolled out, twist all the colors together.
4) Roll that out with your hand so it's twice as long as the original pieces of clay you rolled.
5) Fold in half and twist again, and roll out with your hand. This is swirling and mixing the colors and forming lots of layers within the clay. Do this 2-3 times total.
6) Form a ball with the clay.
7) Take your jar or rolling pin and roll the ball flat, you'll start to see a beautiful pattern emerge. I recommend using a glass vase instead of a rolling pin so you can see what it looks like. Roll to a thickness of 1/4".
8) Find a part of the marbled pattern that you like and trace a circle to cut out.
9) Smooth the clay with your finger if there are any bumps or imperfections.
10) Transfer to a baking sheet with parchment paper. You'll bake the clay according to your brand's instructions.
11) Once they are done baking, remove from your oven and let it cool. When they coasters are back at room temperature, use your liquid gilding and a fine brush to paint the outside edges.
You can also create this DIY into a bowl for your rings.
7) MASON JARS

•Mason jars
•Painters tape
•Pastel paints
•White paint
•Paint brushes
Coat your mason jar with white paint and let that sit. Then, make some striped patterns with your tape and paint the space with your pastel paints and remove the tape, and let that dry. You can sand it down to give it a more distressed look once the paint dries if you want a more rustic feel.
8) PILLOW CASES

•Pillow cases
•Computer
•Transfer paper
•Iron
Go onto any word document or pages document and type out what you want using the font that you want. I recommend you print it out on regular paper to make sure everything is okay before using the more expensive paper. Then, print it out on the expensive paper and iron your surface on the pillow case. Put the transfer paper on the surface and iron it down using the instructions for your transfer paper, and take the paper off to reveal your text. I don't believe that you have to turn it around, I'm not sure.
9) WATERMELON DOILY GARLAND

•Twine
•Small round doily
•Green paper
•Red paper
•White sharpie
•Black sharpie
•Hot glue gun
Cut your round doily in half to create a half circle. Then, make a smaller half circle with your green paper and an even smaller half circle with your red paper. Add some seed shapes with your black sharpie. Glue everything together as shown on the picture : Glue the green paper on top of the doily, and glue the red paper on top of the green. On the edge of the white and red paper overlapping one another, use your white sharpie and draw out the shape. Then, glue the watermelon shape on your twine and hang it up.
10) FRUIT MASON JARS

I will be creating the pineapple jar
•Mason jar
•Yellow paint
•Black sharpie
•Green paint
•Paint brush
•Mod Podge
•Sponge brush
•Twine
Paint the mason jar with your yellow paint and let that dry, and then draw some triangular like shapes as shown on the picture on your jar and coat that with mod podge. Paint the top with your green paint and let that dry, and then wrap some twine around it.
I really hope you guys liked this post. It's so sad to think that there will be no more summer posts anymore, but there will for sure be fall posts coming your way soon, which I am so excited about! If you decide to recreate any of these DIY's, make sure to use the #lookneondots on Instagram or any other social media, tag me on your pictures, or DM me. Again, make sure to follow me on my accounts down below. Kisses to my neonators!
XOXO,
Neon Dots
Instagram: https://www.instagram.com/neondotsofficial/
Snapchat: neondots1
If you are new to my blog, hi, I'm neon dots and welcome to the neonator family! If you like this post and want to find out when I post, make sure to follow me on all of my social media accounts ,which will be linked at the end of this post, and let's get started!
1) WHITE EYELASH POT

•Vase
•White paint
•Paint brushes
•Sharpie
•Mod Podge
Take your vase and paint it white, and let that dry. Then, draw on some lashes and a cute little smile with your black sharpie and coat that on mod podge.
2) FLORAL LETTER

•Letter shape
•Fake flours
•Glue gun
•Twine
Take your fake flowers and cut the stem off of it. Then, start gluing them onto your letter, and tkae some twine, and glue it to the back of your letter and hang it on your wall or door.
3) ROUND FAIRY LIGHTS
•Balloons
•Mod Podge
•Sponge brush
•Twine
•Fairy lights
Coat your balloon with mod podge after blowing up the balloon and pop the balloon. Then, let the ball dry and leave a large hole on the top. Take your fairy lights and put them in the hole.
4) ACCESSORY TREY
•White rectangular trey
•Painters tape
•Grey paint
•Paint brush
•Mod podge
Make a rectangular angle on your trey using your painters tape, and on the bottom, paint on your gold paint and let that dry. Remove the tape and coat it with mod podge to seal everything in place.
5) DIY POLAROID HANGER

•Twig or stick
•Nails
•Hammer
•Twine
•Glue gun
•Scissors
•Printed paper
(I would use twigs and twine to give it a more homey feel)
Take your twig and hammer three nails on the twig with your hammer. Cut a long piece of string and hang up some twine on the top. Then, hang three long pieces of twine on the bottom and glue on three polaroids per twine, and cut three triangle pieces and glue them to the bottom.
6) MARBLE COASTERS

•Sculpey oven bake clay (various colors)
•X-acto knife
•Rolling pin or clear jar
•Large can, jar or stencil to trace
•gold liquid gilding
•Small paintbrush
•Mod podge
•Sponge brush
•Baking trey
•Parchment paper
1) Break off several pieces of color that you'd like to use for your coaster,
2) Roll them out with your hand on a clean even surface so they are even in length. It's okay if some are different thicknesses, that will give your end result a more interesting look.
3) Once they are all rolled out, twist all the colors together.
4) Roll that out with your hand so it's twice as long as the original pieces of clay you rolled.
5) Fold in half and twist again, and roll out with your hand. This is swirling and mixing the colors and forming lots of layers within the clay. Do this 2-3 times total.
6) Form a ball with the clay.
7) Take your jar or rolling pin and roll the ball flat, you'll start to see a beautiful pattern emerge. I recommend using a glass vase instead of a rolling pin so you can see what it looks like. Roll to a thickness of 1/4".
8) Find a part of the marbled pattern that you like and trace a circle to cut out.
9) Smooth the clay with your finger if there are any bumps or imperfections.
10) Transfer to a baking sheet with parchment paper. You'll bake the clay according to your brand's instructions.
11) Once they are done baking, remove from your oven and let it cool. When they coasters are back at room temperature, use your liquid gilding and a fine brush to paint the outside edges.
You can also create this DIY into a bowl for your rings.
7) MASON JARS

•Mason jars
•Painters tape
•Pastel paints
•White paint
•Paint brushes
Coat your mason jar with white paint and let that sit. Then, make some striped patterns with your tape and paint the space with your pastel paints and remove the tape, and let that dry. You can sand it down to give it a more distressed look once the paint dries if you want a more rustic feel.
8) PILLOW CASES

•Pillow cases
•Computer
•Transfer paper
•Iron
Go onto any word document or pages document and type out what you want using the font that you want. I recommend you print it out on regular paper to make sure everything is okay before using the more expensive paper. Then, print it out on the expensive paper and iron your surface on the pillow case. Put the transfer paper on the surface and iron it down using the instructions for your transfer paper, and take the paper off to reveal your text. I don't believe that you have to turn it around, I'm not sure.
9) WATERMELON DOILY GARLAND

•Twine
•Small round doily
•Green paper
•Red paper
•White sharpie
•Black sharpie
•Hot glue gun
Cut your round doily in half to create a half circle. Then, make a smaller half circle with your green paper and an even smaller half circle with your red paper. Add some seed shapes with your black sharpie. Glue everything together as shown on the picture : Glue the green paper on top of the doily, and glue the red paper on top of the green. On the edge of the white and red paper overlapping one another, use your white sharpie and draw out the shape. Then, glue the watermelon shape on your twine and hang it up.
10) FRUIT MASON JARS

I will be creating the pineapple jar
•Mason jar
•Yellow paint
•Black sharpie
•Green paint
•Paint brush
•Mod Podge
•Sponge brush
•Twine
Paint the mason jar with your yellow paint and let that dry, and then draw some triangular like shapes as shown on the picture on your jar and coat that with mod podge. Paint the top with your green paint and let that dry, and then wrap some twine around it.
I really hope you guys liked this post. It's so sad to think that there will be no more summer posts anymore, but there will for sure be fall posts coming your way soon, which I am so excited about! If you decide to recreate any of these DIY's, make sure to use the #lookneondots on Instagram or any other social media, tag me on your pictures, or DM me. Again, make sure to follow me on my accounts down below. Kisses to my neonators!
XOXO,
Neon Dots
Instagram: https://www.instagram.com/neondotsofficial/
Snapchat: neondots1

Comments